A tape, a plumb line, a level and a phone cover five home checks. What bike fit apps measure, how accurate they are, and the signs it is time for a fitter.
A DIY bike fit can cover five checks at home with a tape measure, a plumb line, a spirit level and a phone: cleat position, saddle height, saddle setback, saddle tilt, and handlebar reach and drop. That is enough to set up a bike that feels wrong or to keep your own record. Home fitting cannot measure saddle pressure, read your feet in detail or explain pain, and phone apps that read joint angles from video are less exact than their numbers suggest. Pain, numbness or a problem on one side is the point to book a fitter.
Can you do a bike fit at home?
Yes, for the basics. A careful rider can measure and set the cleats, saddle height, setback and tilt, and the handlebar position at home. What home fitting cannot do is see what a fitter sees: how your body moves, why something hurts, and which change to make first.
Careful home work seems to help. In a 2016 survey of 849 cyclists by Priego Quesada and colleagues, riders who had fitted their own bike, and riders fitted by a professional, both had more than twice the odds of riding without pain as riders with no fit. Neither kind of fit went with fewer injuries over the previous year, and a survey shows links, not causes.
You need a steel tape measure, masking tape and a marker, a plumb line (a string with a small weight), a spirit level, round stickers, hex keys, a torque wrench and an indoor trainer. Add a phone that films in slow motion, and check its level app against the spirit level.
Work safely. Tighten every bolt to the maker's torque figure, never raise a seatpost above its minimum insertion mark, and use carbon assembly paste where the maker asks for it. Write each setting down before you change it, so you can always go back.
What can you check at home?
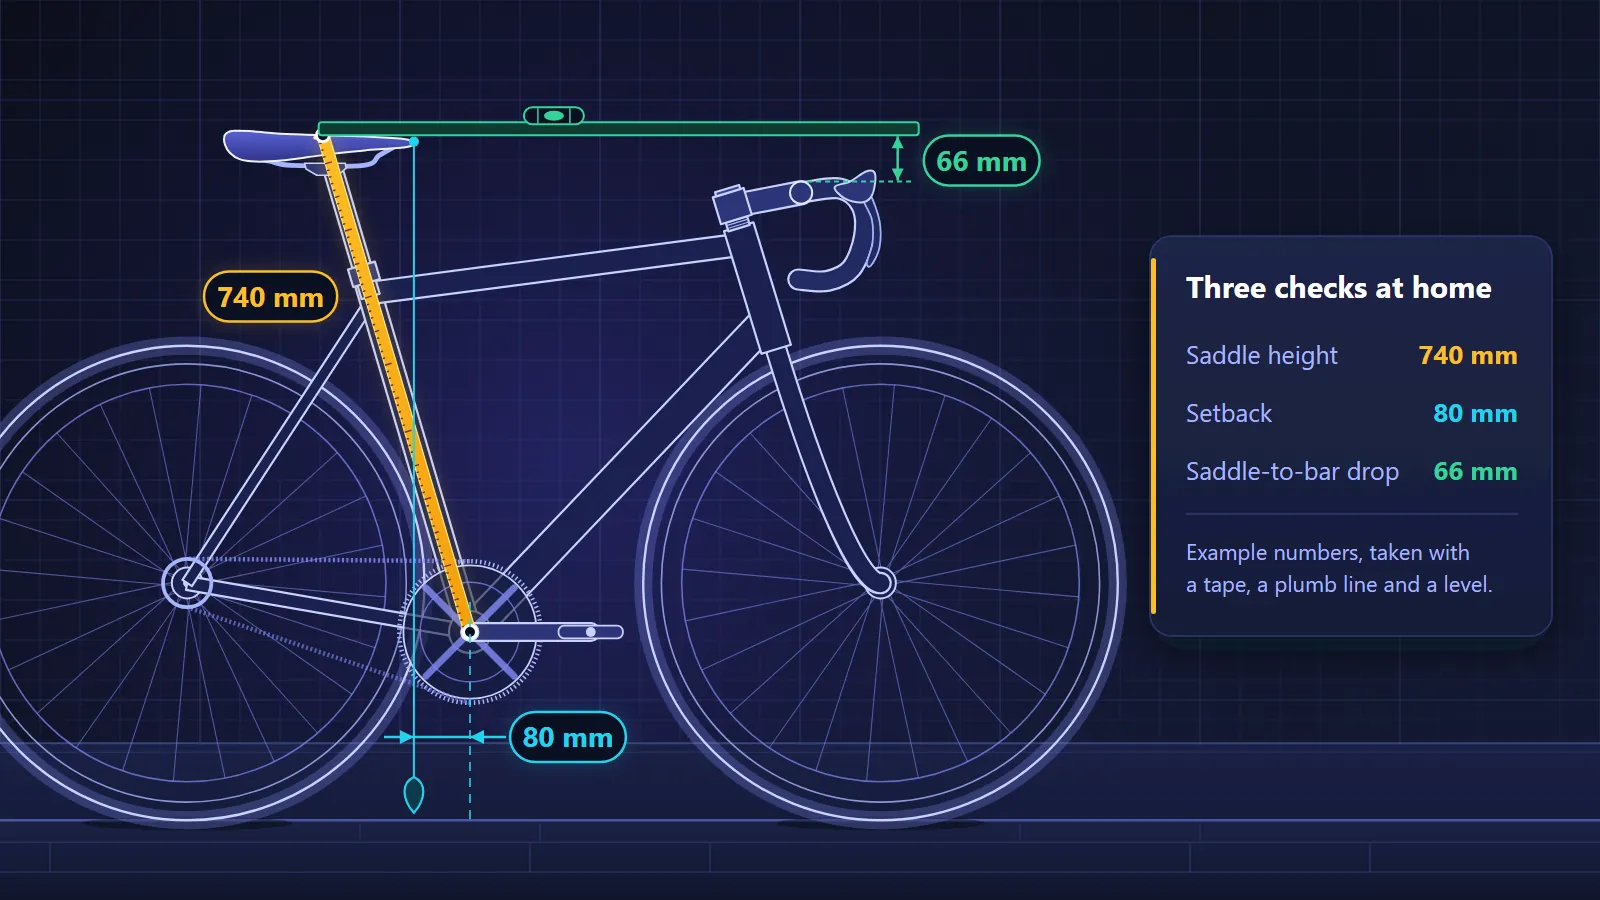
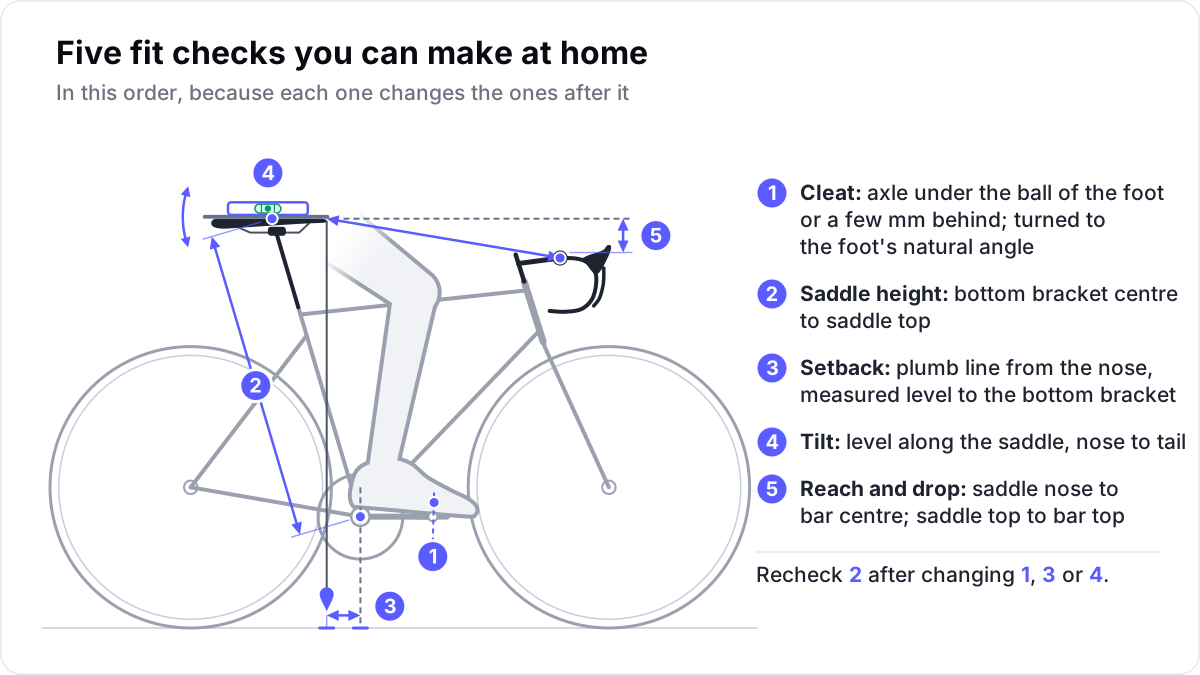
Five things: cleat position, saddle height, saddle setback, saddle tilt, and handlebar reach and drop. Check them in that order, because each one changes the ones after it, and write each number down with the point you measured it from.
How do I set my cleats at home?
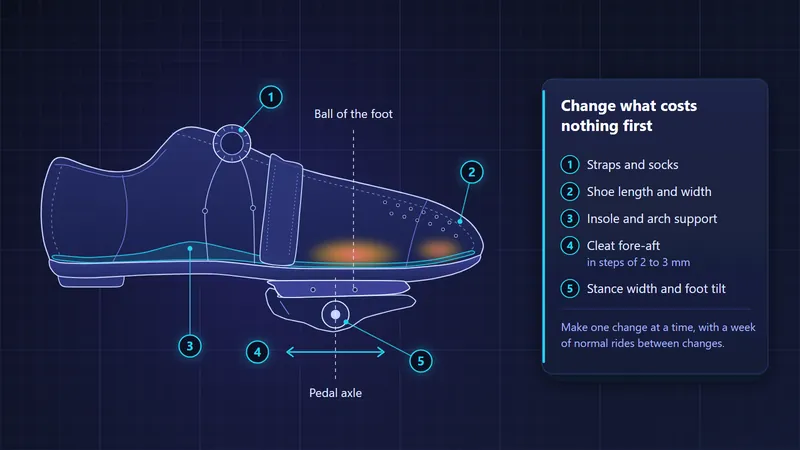
Mark the ball of the foot on the side of each shoe, and set the cleat so the pedal axle sits under that mark or a few millimetres behind it. Then turn the cleat to match the way your foot points when it hangs freely. Set each foot on its own.
To see how your feet point, sit on a high table with your legs hanging. Feet often differ, so copy nothing from one shoe to the other. Our cleat position checklist covers float, stance width and the landmarks. Wedges and shims, which tilt or raise the foot, belong with a fitter.
How do I set my saddle height at home?
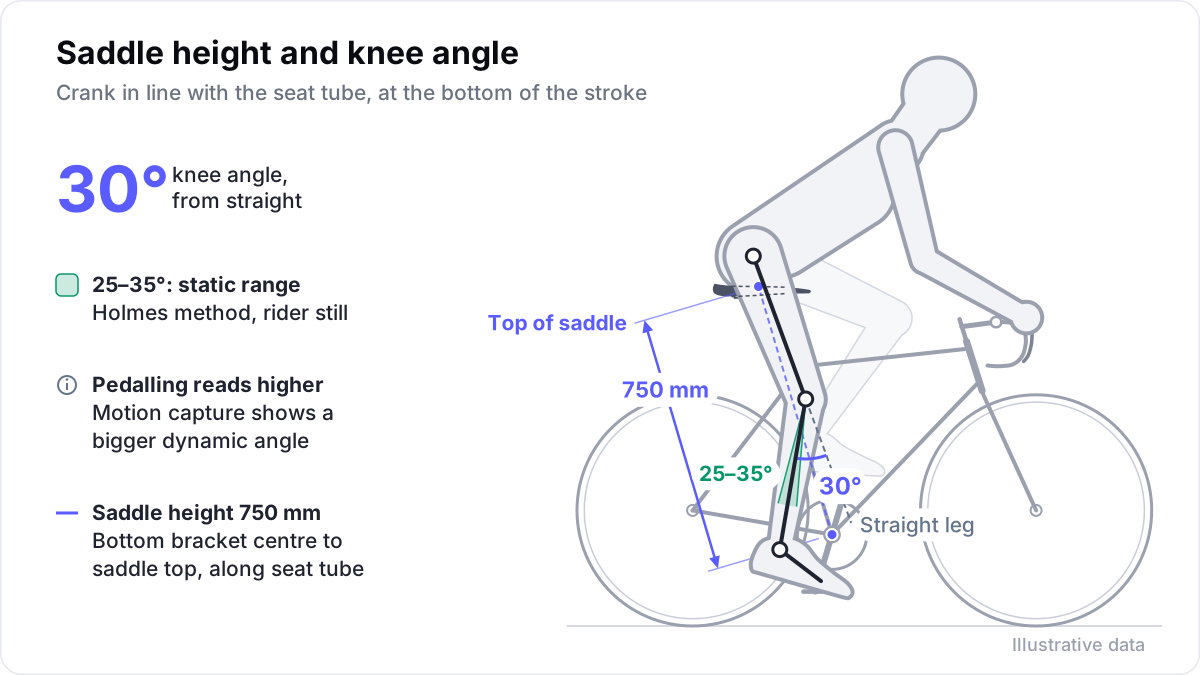
Start from your inseam with a saddle height calculator, set the saddle to that height, and then film yourself pedalling to check the knee at the bottom of the stroke. Measured while pedalling, the knee usually bends about 33 to 43 degrees from straight.
The saddle height calculator works out the two common inseam formulas and draws the point each one is measured from. Our saddle height guide compares the methods. Measured with the rider still, the target is about 25 to 35 degrees instead. Some apps also show the inside angle, where a straight leg reads 180, so subtract it from 180.
How do I check saddle setback and tilt?
For setback, hang a plumb line from the saddle nose and measure level to a mark on the floor under the centre of the bottom bracket. For tilt, lay a level on a straight edge along the saddle from nose to tail. Change either in small steps, and check the saddle height again afterwards.
Sliding the saddle 10 mm back on its rails raises it in effect by about 3 mm on a road frame. Most riders start with the saddle close to level and change the tilt a degree at a time. Our guide to saddle setback adds a hands-off balance check on the trainer.
How do I check handlebar reach and drop?
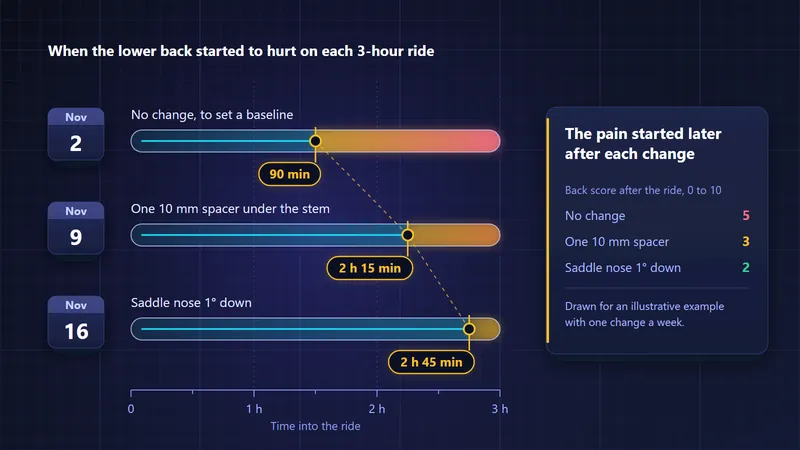
Measure reach from the saddle nose to the centre of the handlebar at the stem, and drop as the height of the saddle top above the bar top. Change them with the stem or the spacers, in steps of about 10 mm, and ride a few times before you judge the change.
After an hour on the hoods, are your elbows slightly bent and your hands light? Is your neck relaxed, and do your hands stay free of numbness? Moving spacers within the maker's limits is a home job. Cutting a steerer tube is not.
How do you measure your knee angle with a phone?
Put the bike on a trainer, stick markers on your hip, knee and ankle, and film from the side with the phone level, square to the bike and at hip height. Warm up, pedal for two minutes at your usual effort, then film in slow motion and read several strokes.
Put the markers on the bony bump at the side of the hip, the centre of the outside of the knee joint and the bony bump on the outside of the ankle. Wear tight shorts so the markers stay put.
The 2024 expert consensus on bike set-up measurements (Priego-Quesada and colleagues, Sports Medicine) asks for at least two minutes of pedalling at the intended effort and cadence before recording, and gives the mean of ten strokes as an example summary. It names the two weak points of filming from one side: finding the centres of the joints, and parallax, the error from a camera that is not square to the bike.
Frame rate matters too. At 90 revolutions a minute the crank turns 540 degrees a second. At 30 frames a second it moves 18 degrees between frames, so the frame nearest the bottom of the stroke can miss it by up to 9 degrees of crank. At 240 frames a second the gap between frames is a little over 2 degrees.
How accurate are bike fit apps?
Expect an error of a few degrees at the knee in good conditions, and 4 to 10 degrees in some studies, with the ankle read worst. We found no independent published test of a commercial bike fit app, so these figures come from studies of the same methods.
- One camera with markers. Fonda and colleagues filmed 11 cyclists with one high-speed camera and with 13 motion-capture cameras. The single camera read the knee angle at the bottom of the stroke slightly lower than the 3D system. They judged it valid, with a correction of 2.2 degrees.
- Software that finds the joints in a video. Bini and colleagues tested pose-estimation software on videos of cyclists. With 14 cyclists, the better program's average bias was under 2 degrees at two crank positions. With 26 cyclists, it differed from markers by 4 to 8 degrees at the hip and knee, and by 15 to 22 degrees at the ankle.
- Two smartphones. Kakavand and colleagues compared OpenCap, a Stanford research tool that measures movement from smartphone video, with marker-based capture in 10 riders. The knee angle rose and fell closely with the lab system's, but the typical error at the knee was about 9 to 10 degrees.
An error of 10 degrees is as wide as the whole 25 to 35 degree target band. So treat an app's knee angle as a rough check, film with markers where you can, and judge a change by comparing two videos taken the same way.
| Phone video can show | Phone video cannot show |
|---|---|
| Knee and hip angles from the side, within a few degrees in good conditions | Saddle pressure, or which tissue carries the load |
| The angle of your back | What your feet do inside the shoes |
| Rocking hips or a drifting knee, filmed from behind or in front | Why something hurts |
| Before-and-after videos taken the same way | Your history of injuries, earlier fits and what was tried |
When should you see a bike fitter instead?
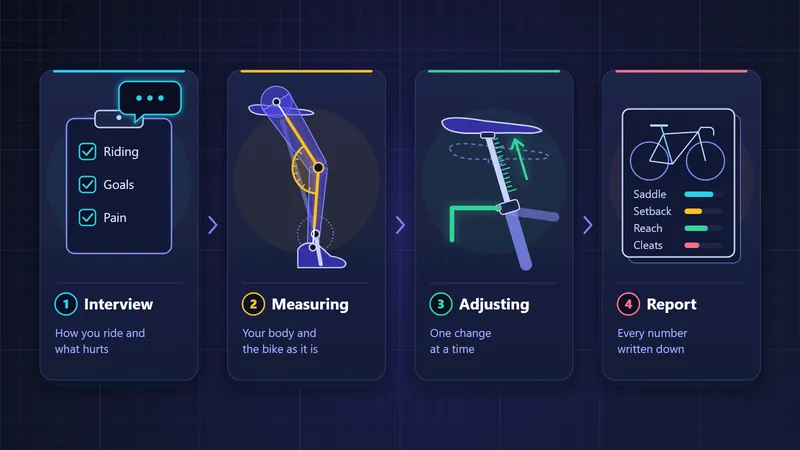
See a fitter when something hurts or goes numb and two or three careful changes at home have not helped, when one side feels different from the other, after an injury, for a time trial or triathlon position, or before you choose a frame size.
A fitter brings what a phone lacks: a trained eye, tests of flexibility and of the feet, motion capture or pressure mapping, and the judgement to change the right thing first. Our guide to bike fitting software describes a studio's tools. Bring your home numbers, which show where the bike is now. Pain that came on suddenly, follows a crash or stays off the bike belongs with a physio or doctor first.
How do you keep your home measurements useful?
Write each number down with the date, the point you measured it from and the reason for any change, and add how the next few rides felt. A fitter can then start from your record instead of measuring everything again.
An illustrative home record looks like this:
| Measurement | Value | Measured from |
|---|---|---|
| Cleats | Axle 3 mm behind the ball of the foot, both feet | Marks on the side of each shoe |
| Saddle height | 742 mm | Bottom bracket centre to the saddle top, 135 mm behind the nose |
| Setback | 78 mm | Plumb line through the bottom bracket to the saddle nose |
| Saddle tilt | 1 degree nose-down | Level on a straight edge, nose to tail |
| Saddle to bar | 520 mm | Saddle nose to the bar centre at the stem |
| Drop | 75 mm | Saddle top to bar top, vertically |
| Knee bend, pedalling | 38 degrees | Slow-motion video, mean of ten strokes |
In Velograph, a rider can add measurements to a bike and answer "I did" when asked who measured. Each number has a picture and steps for measuring it, and the fit is marked as the rider's own, so a fitter later knows who took it. Our page for riders sets out what a rider gets on their own.
Further reading
- Validity and reliability of different kinematics methods used for bike fitting, Journal of Sports Sciences, 2014.
- Criterion validity of neural networks to assess lower limb motion during cycling, Journal of Sports Sciences, 2023.
- Comparison of kinematics and kinetics between OpenCap and a marker-based motion capture system in cycling, Computers in Biology and Medicine, 2025.
- The association of bike fitting with injury, comfort, and pain during cycling: an international retrospective survey, European Journal of Sport Science, 2019.
Velograph is not affiliated with, sponsored by or endorsed by any team, rider or company named in this article. Names are used only to refer to publicly reported work.