What stack and reach mean on a geometry chart, why they beat size labels and top tube length, and how stems and spacers decide where your hands end up.
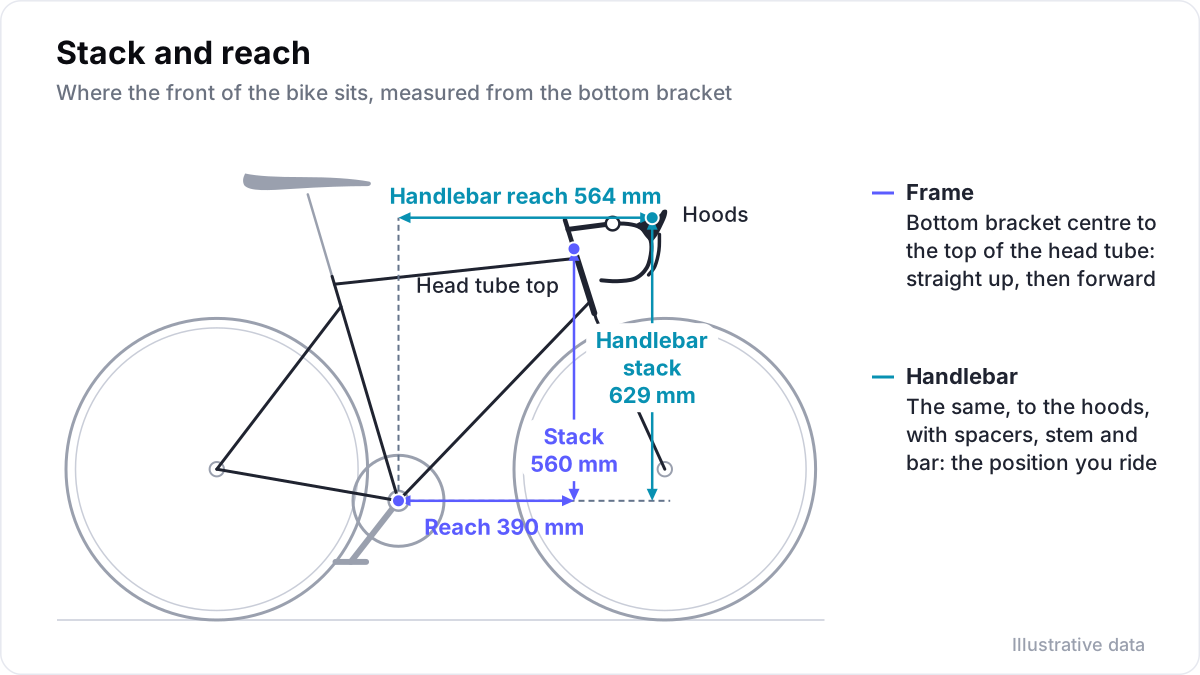
Stack and reach are the two numbers that place the top of a frame's head tube relative to the bottom bracket. Stack is the vertical distance and reach the horizontal one. Both start at the bottom bracket, so they ignore seat tube angles, sloping top tubes and each brand's size labels. That makes them the fairest way to compare frames. To know where your hands will be, add the stem, spacers and handlebar. That gives handlebar stack and reach, the coordinates fitters work with.
How are stack and reach measured?
On a geometry chart, stack and reach are both measured from the centre of the bottom bracket to the top of the head tube, at its centre. Stack is the vertical distance between those two points, and reach is the horizontal one.
Dan Empfield, the triathlon bike designer who founded Slowtwitch, is widely credited with defining the terms in the early 2000s, to give riders a way to compare frames across brands. They now appear on the geometry charts of most major makers.
Read the drawing next to the chart before you compare numbers. Makers do not all measure to the same point: check whether stack ends at the top of the head tube or includes the headset's top cover, which can add several millimetres. A 5 mm difference in how two brands measure is as large as many of the differences you are trying to compare.
Why are stack and reach better than frame size?
Stack and reach compare frames more fairly than size labels or top tube length, because both start at the bottom bracket. Each brand measures its size labels in its own way, and top tube length changes with stack and seat tube angle as well as with reach.
Size labels are not a measurement. One brand's 56 may be measured along the seat tube to the top of the tube, another's to the centre of the top tube, and many brands use S, M and L. Two frames with the same label can differ by a centimetre or more at the handlebar.
Top tube length misleads in a quieter way. The effective top tube is measured horizontally from the top of the head tube to the seat tube line. It therefore depends on stack and on the seat tube angle as well as on reach. As a formula, effective top tube is roughly reach plus stack divided by the tangent of the seat tube angle. Take two frames with identical reach:
| Frame 1 | Frame 2 | |
|---|---|---|
| Stack | 560 mm | 580 mm |
| Reach | 390 mm | 390 mm |
| Seat tube angle | 73.5 degrees | 73.0 degrees |
| Effective top tube | 556 mm | 567 mm |
Frame 2's top tube is 11 mm longer, yet its head tube sits no further forward. It is taller, not longer. A rider comparing top tubes would choose a shorter stem for Frame 2 and end up with the bar 11 mm too close. The seat tube angle matters for where the saddle sits, but the seatpost and saddle rails set that, not the front end.
How do you read a frame geometry chart?
Read a frame geometry chart for fit by starting with stack and reach. Then check the stack-to-reach ratio, the head tube angle and the seat tube angle. They show how upright the frame is and where stems and seatposts put the bar and saddle.
These are the numbers that matter for fit:
| Number | What it tells you |
|---|---|
| Stack | How high the front end can go before spacers |
| Reach | How far forward the front end sits |
| Stack-to-reach ratio | Stack divided by reach; a higher ratio means a more upright frame (560/390 is 1.44, 590/380 is 1.55) |
| Head tube angle | The line spacers and stems work along, which matters for the sums below |
| Seat tube angle | Where a given seatpost puts the saddle, front to back |
| Head tube length | Mostly a way to reach a given stack; compare stack itself |
Bottom bracket drop, chainstay length and trail describe how a bike handles. They matter, but they do not change where your contact points are.
What are handlebar stack and reach?
Handlebar reach is the horizontal distance from the centre of the bottom bracket to the centre of the handlebar at the stem clamp, and handlebar stack is the vertical one. Hood stack and reach run to the point where your hands rest on the hoods.
With these numbers, a fitter can describe your position without mentioning a frame at all. Add saddle height and saddle setback, and you have a set of coordinates that fits any frame. If two frames can put the bar and saddle at the same coordinates with sensible parts, both can carry your fit.
Some brands now publish hand positions too. One maker, for example, gives effective stack and reach to the hoods with the stock cockpit. In size M, its aero race frame puts the hoods at 642 mm stack and 563 mm reach, and its endurance frame at 675 mm and 547 mm. The two bikes carry the same size letter, yet the hoods are 33 mm apart in height. Handlebars also differ in reach and drop, and shifters differ in shape. The hoods can move even when the bar clamp stays put, so measure to the hands, not only to the clamp.
How do stems and spacers change handlebar reach?
Spacers raise the handlebar and move it back a little, because they stack along a steerer that leans back at the head tube angle. A longer stem moves the bar forward, and flipping a stem to a positive angle raises the bar and pulls it back.
A few rules of thumb are worth knowing, here for a 73 degree head tube:
- 10 mm of spacers raises the bar 9.6 mm and moves it back 2.9 mm.
- Stem angle is measured from a line square to the steerer, not from the horizontal. On a 73 degree head tube, a minus 17 degree stem sits level, and a minus 6 degree stem still points 11 degrees upwards.
- Flipping a 110 mm stem from minus 6 to plus 6 degrees raises the bar about 22 mm and pulls it back about 7 mm.
- A 10 mm longer stem at minus 6 degrees moves the bar about 10 mm forward and 2 mm up.
The limits are practical. Fork makers set a maximum spacer stack, a cut steerer cannot grow back, and one-piece bar and stem cockpits come in fewer sizes than separate parts. Very short or very long stems also change how the bike steers. A frame that needs extreme parts to reach your position is the wrong size or the wrong shape for you.
Comparing two frames: a worked example
A rider's current bike, Frame A, has a stack of 560 mm, a reach of 385 mm and a 73.0 degree head tube. A 110 mm, minus 6 degree stem sits on 25 mm of spacers. Allowing 8 mm for the headset top cover and half of a 40 mm stem clamp, the centre of the bar sits 477.5 mm in front of the bottom bracket and 631.7 mm above it.
Frame B, the candidate, has a stack of 565 mm, a reach of 395 mm and a 73.5 degree head tube. With the same stem and spacers, the bar would sit 10.6 mm further forward and 4.2 mm higher. Swap to a 100 mm stem at the same angle and keep the 25 mm of spacers. The bar then lands 0.8 mm further forward and 2.4 mm higher than now, which is as close as anyone can measure on a workshop floor.
Frame B therefore carries this rider's position with an ordinary stem. If matching the bar had needed a 70 mm stem, or 45 mm of spacers, that would have been the sign to look at another size. Do the same check for the saddle, because a different seat tube angle changes where a given seatpost puts it. Our guide to moving your bike fit to a new bike works through that part.
How do you choose the right frame size?
Choose a frame size from your fit, not from the size label. Get your saddle and handlebar coordinates first, then shortlist frames that put the bar there with a mid-range stem and some spacers to spare. Check that a seatpost can put the saddle back where it was.
A short checklist before you order:
- Your coordinates. Get them first: saddle height and setback, and handlebar and hood stack and reach, from your last fit or measured off your current bike.
- A shortlist. Keep only frames that put the bar at those coordinates with a stem in the middle of the usual range and some spacers left for later changes.
- The saddle. Check that the seat tube angle and an available seatpost can put the saddle back where it was.
- The riding. A gravel bike usually wants more stack, as our gravel bike fit guide explains, and a time trial bike is sized by its armrest pads, covered in the time trial bike fit guide.
- The cockpit. Ask about integrated bars, spacer limits and which stem lengths are available.
- The record. A frame's stack, reach and angles belong in your bike fit history next to the fit itself.
Velograph keeps a frame's stack, reach and head and seat tube angles with each bike, so a fitter can check a new frame against the position already recorded.
Further reading
- Road bike geometry explained, Canyon, 2026.
- Bicycle set-up dimensions and cycling kinematics: a consensus statement using Delphi methodology, Sports Medicine, 2024.
Velograph is not affiliated with, sponsored by or endorsed by any team, rider or company named in this article. Names are used only to refer to publicly reported work.